
Making Tomioka Giyu - 1 (The Uniform Jacket)
Anyway! Better late than never! It wasn't long before I decided I wanted to cosplay Tomioka Giyu. And so that this doesn't become one of those blog posts where you have to read my life story before you get to the cookie recipe, I'll just get right down to it.
Tomioka, a breakdown
- Uniform - gakuran-ish uniform with writing on the back, hakama-style trousers, white belt
- Haori - half plain, half printed/patchwork quilted
- Hair - big, puffy, black, with low ponytail
- Feet - some kind of wrap/guard half way up the shins, split toe socks, sandals
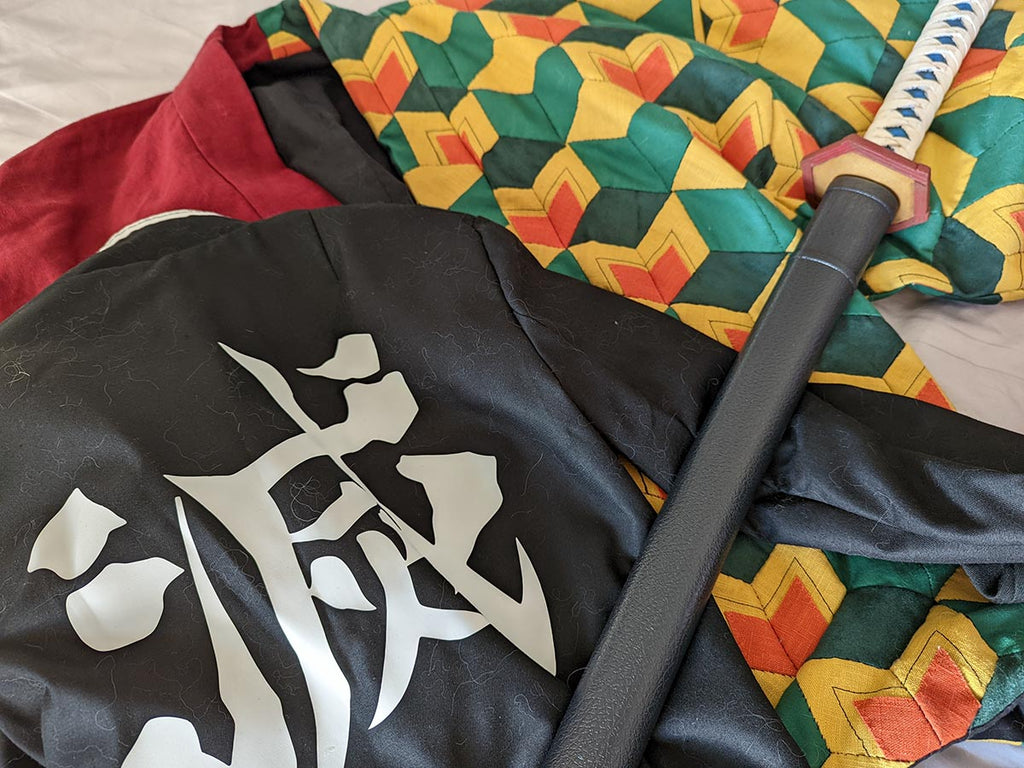
- Weapon - sword with writing
Recommended tools (aside from the obvious sewing and crafting tools)
- overlocker - very highly recommended but not strictly necessary
- vinyl cutter eg cricut or silhouette, but you can do it by hand too
- computer with software to use the vinyl cutter
Experience required
- ability to read sewing patterns and make simple jacket and trousers
- basic understanding of garment ease and fitting
- know how to use bias binding
Let's start with the uniform.
Uniform Jacket
The uniform in Demon Slayer is black and white, and although the style reminds people of stiff gakuran, it looks roomy and soft so that the characters can fight in them. I would guess "traditionally" it should be a very tightly woven cotton, linen or hemp, but for price and ease of use I chose to use gaberchino.
Gaberchino does have a twill weave on the right side, for this project I didn't want the twill to show so I used it with the wrong side out. Do pre-wash the fabric — I noticed when I washed my jacket after wearing it to a con, that the black bled out very very slightly so the white trim on the collar got a tiny bit dyed. This could've been prevented with a pre-wash.
For pattern, it's not a very complicated outfit and experienced cosplayers may be able to adapt another pattern or draft it themselves. For me, to minimise the thinking required, I bought a simplified gakuran pattern from Dr-Cos for 700 yen. It's in Japanese, of course, but if you have sewn a few things before, the reading isn't really necessary. For trousers I took a generic trouser pattern to modify.
(You might notice that they also have a good hakama pattern for the trousers! I didn't get it because I already knew how I was going to make them.)
If you're using a gakuran pattern, then you should shorten it. It should still be long enough to be tucked into the trousers though, and if you plan to add a lining later, leave a bit more at the lower hem for turning up. Also check if there are other alterations you'll need to make. For example, the pattern I got had a centre seam down the back, which would get in the way of the writing, so I got rid of it by changing it into a 1 piece back. (Remember to remove the seam allowance!)
I made the alterations and cut out the pieces, ignoring the pocket pieces as they're not right for this costume:

At this stage, you need to: 1. put the collar together, add the white bias binding and sew a black line in the middle, 2. decide if you're going to make a real chest pocket or fake it with the same bias binding.

As cosplays are always better with pockets, I decided to make the chest pocket real. The pocket on the Demon Slayer uniform is quite high up, so what's on the purchased pattern wasn't in the right place, and I had to mark it myself by draping the front jacket piece on me and eyeballing where it needed to be.
I have awful memory and need to look things up every time I need to do a welt or bound pocket.

It's not time to sew the pieces together yet, because there's the all-important writing on the back to do.
There are several ways to add the METSU kanji - applique, painting, printing, iron-on vinyl. I chose the vinyl because I have the tools and I found the technique easy. The other methods I wasn't sure I could make it really neat. (And using white paint on black fabric is just a pain.)
Off to find me a good clear picture of the kanji:

I took that, put it in a photo editing software and neatened it up. Then I took it across to the vinyl cutting software. Measuring the fabric for the back and comparing it with references, the writing should be about 25cm across, so I sized it that way. The vinyl cutter I have can only handle the width of A4 so some creative rearranging was necessary.

A test cut-out on regular paper, and it looked about right for my back. If you are larger or smaller, change the size of the kanji and keep testing until you get it right.

Happy with the test, I got it cut out on garment vinyl. If you don't have a vinyl cutter, you can draw out the required shapes directly on the protected/shiny side of the vinyl, cut it out by hand and then iron them on. For better accuracy, print out the design on paper to check sizing and then use it as a template to trace and cut out your vinyl pieces.

When using garment vinyl with a home iron, always follow the instructions. For designs with multiple pieces and narrow points, if you need to re-iron some spots after peeling off the protective layer, use a piece of baking parchment (blue starred in my photo) in-between, then the vinyl won't stick to your iron. Never use a hot iron directly on vinyl, it'll ruin the design, the fabric, and possibly the iron. To generally iron the fabric flat afterwards, iron on the reverse side.
Finally, it's time to sew the jacket pieces together. For wearing comfort, I added a lining. Nobody is ever going to see it so I used a wine red one that was left over from another project.
The buttons I used are plain, round, gold ones. (They're meant to have a design, but I can replace them if I ever find/make the right buttons.) The button locations were different from the ones on the pattern because this was a shorter jacket. If you or your sewing machine are not comfortable with making buttonholes, you can fake it by putting on gold buttons but actually use snap fasteners underneath. I'd avoid using velcro though because this is meant to look quite soft and velcro tends to add stiffness. If it was a military uniform with heavy fabric it'd be okay.
At this stage I realise I never took photos of the finished jacket on its own, so I should go do that, but here is a picture where you can see the collar with white trim, the pocket, and the buttons.
