
Making Tomioka Giyu - 3 (The Haori)
Previous posts on making Tomioka:
1 - The Uniform Jacket
2 - The Uniform Trousers
The Haori
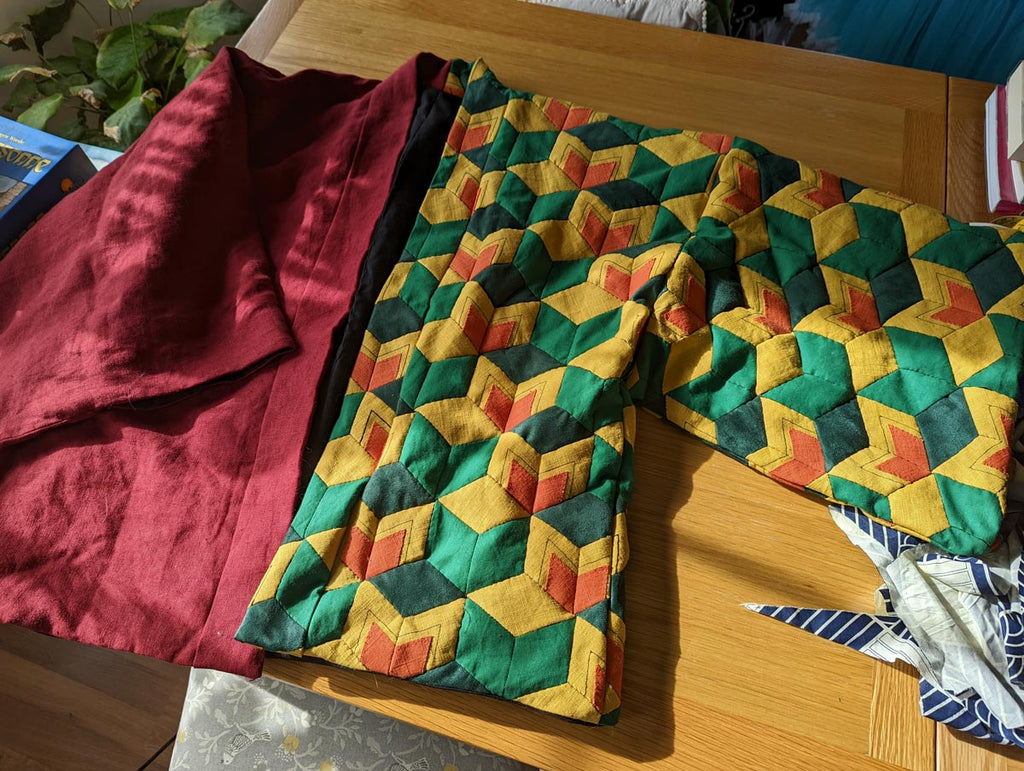
Tomioka's half/half haori is one of those costume pieces that people immediately think of when the character is mentioned.
The structure of a haori is pretty simple, patterning it yourself isn't difficult to do. To make it even easier (because there'll be more than enough to do later on in terms of patchwork), I used a free pattern from Dr. Cos.
An important thing to remember is that a haori normally doesn't have shoulder seams (more on this later). This means it needs a longer length of fabric than one might think. However, because this haori is half and half, this can mean getting a lot of red fabric and then only using half of it if you're cutting it along the grainline. So it's worth testing the fabric, and if it behaves about the same across the grain and the width of it is enough for the length of the haori, you can pattern out your pieces that way to save money.
My haori fabrics:

From top to bottom (phone camera has messed with the colours a bit here): leftover fabric I dyed with Dylon in rosewood red, bottle green faux suede, klona cotton in hunter, leftover linen I dyed orange with leftover Dylon hand dye, and linen in gold.
(I have a lot of leftovers I hoard from other projects...)
I chose these fabrics for their textures. Fabrics that are clearly synthetic would probably look out of place on a haori like this, and I just like the way these fabrics look when put together.
With the red fabric, I made the right side of the haori. Note that instead of one long collar piece, the collar also needs to be half red half patterned, so you wouldn't need as long a length of fabric for that part.
And then, on to the main event: p a t c h w o r k.
Disclaimer: I'd never quilted or did patchwork before. Which probably makes me a glutton for punishment, picking this for my first project. But once I had all the diamonds prepared and knew what I was doing, I could spent my time patchworking and watching anime at the same time (dubbed, not actually good enough to not keep looking at what I was doing), meaning I caught up with a lot of episodes...
The basis of Tomioka's pattern is called "tumbling blocks", consisting of 3 diamonds put together into a hexagon, then many hexagons are sewn together. The aim is the create a piece of fabric that you can then use to sew into the left half of the haori. You can use the sewing pattern and find out exactly the size your "quilt" needs to be, and sometimes only half complete hexagons at the sides.

But to get to this stage, you first need to prepare the individual diamonds.
To make the diamonds, I used a method called "English Paper Piecing" (EPP). To do this, get pieces of paper in the size and shape of the diamonds, wrap the fabric around it, and temporarily glue this down. There are lots of online tutorials out there so it's not worth me trying to explain what other very experienced quilters have explained better! But two things I learned which I must share: 1) the water soluble glue stick by Sewline is amazing for this purpose, and 2) faux suede looks great but it's annoying to try to glue. A warm iron helps, but be careful not to burn the fabric.
But before I could start EPP, there were a few more things: linen can fray quite a bit when cut, which made small seams particularly annoying. This situation can be improved by using a layer of soft iron-on interfacing:

And the little orange diamonds that's on top of the yellow diamonds were prepared with bondaweb. This allowed me to easily draw lines on the paper backing and cut the little diamonds out. The bondaweb helped prevent too much fraying, and I could then attach the little orange diamonds onto big yellow diamonds by ironing them on. (Urgh, so many diamonds.)

When ironing the orange onto the yellow, depending on how picky you are, you might want to pay attention to grain direction.

Above: experimenting with grain directions and stitching. I eventually settled on this: ironed-on orange, blanket stitched around the edge (it just looked less fake close up) and then a machine-stitched black line. When adding the black line, I did them one after another, without starting and stopping the stitch with each diamond so that they sort of formed a chain, then just cut them apart by cutting the black thread between each diamond. It's much much faster that way.
Now there are lot of fabric diamonds. Next is to have paper diamonds to wrap the fabric around. There are ready made one you can buy, but if you can't find ones in the size you want, and if you have a vinyl cutter and thick paper...

After wrapping the fabric diamonds around the paper diamonds and gluing them down, finally hexagons could be made by sewing diamonds together with whipstitch. Tomioka requires hexagons with two designs. (I know the one on the right is a bit wrong with grain direction and lack of blanket stitch, it was a test piece.)

(You don't have to make the hexagons, you could just start patchworking with the diamonds. But for me it's much easier to visualise the pattern I needed to build by making the hexagons first.)
Then, whipstitch these hexagons together into the size of fabric needed to make the other half of the haori.

To avoid needing hundreds and hundreds of paper diamonds, once something was stitched together and I was several rows away from it, I started removing the papers to be reused on future diamonds. Diamonds, hexagons, big quilt, done in batches.
Near the start of this post, I mentioned no shoulder seams. Theoretically, for a haori you need 5 pieces of fabric: left sleeve, right sleeve, left half, right half, collar. The collar in this one obviously has to be 2 pieces because of the half and half design. But on the patchworked side, if the whole side is made of one piece of fabric, once it goes over the shoulder the pattern would turn upside down. So I ended up looking at how it was done on various figures.

They gave him a shoulder seam on the left so that the pattern would make sense! So that's what I did as well. This means for this haori, there are 7 pieces: left sleeve, right sleeve, left half front, left half back, right half, left collar, right collar.
If you do this, it doesn't matter if you want to make one big piece of quilt and then cut the pieces from it, or make multiple small quilts and trim them to the required sizes. But remember to remove the paper backing when finished, and I recommend cutting the actual pieces using an overlocker if you have one, otherwise when the quilt is cut, the pieces can unravel and you'd be spending time securing all the pieces along each edge.
Now the left side can be assembled, and sewn to the red side on the right. At this point, I left the collar alone for now, and made a lining out of leftover black cotton. I sewed this to the haori body, right sides together, leaving the collar edge free. Then I turned it right side out.
Finally, I put the two halves of the collar together. Then I folded it in half lengthways and ironed it for a crease, and also ironed one seam allowance to the inside.
I lined the collar up very carefully, right sides together again, to the middle of the haori so the colour split was at the right place. (Use the edge without the pre-creased seam allowance). Sew through all three layers: collar, haori, lining. Then I folded the collar along the middle crease I made before, pinned the seam allowance along the other crease I pre-made, and attached that edge to the lining by hand, the bottom edges of the collar were neated up at this stage.
Give everything a good press (careful with the heat) if you used faux suede, and...


Haori achieved!
I don't know exactly how long this took me, but it was enough time for me to watch about 2 seasons of BNHA...